Bathroom sink draining slowly? Hair and soap buildup around the stopper, a stopper that does not open fully, or a restriction farther along the drain may be involved. Start with visible, accessible checks. Stop DIY work if chemicals are present, pipes leak, or other fixtures also back up.
For gurgling, odors, or several affected drains, compare the drain troubleshooting paths before choosing a cleaning method. For a kitchen fixture, use the kitchen sink drainage guide, which covers baskets, double bowls, disposals, and dishwasher connections.
Bathroom sink draining slowly: separate drainage from weak faucet flow
Watch what happens during ordinary use. Does water come out of the faucet normally but collect in the basin? That is a drainage symptom. Does only a thin stream come from the spout while the basin stays empty? Start with our guide to low water flow at one faucet instead. Cleaning an aerator changes incoming flow; it does not remove a blockage from the waste pipe.
Do not fill the basin to its rim to demonstrate the problem. A brief observation is enough. Turn the faucet off as soon as water begins accumulating. An overflow opening is not a reason to leave water running unattended.
| What you observe | What it may suggest | Next step |
|---|---|---|
| The stopper barely rises | The opening itself may be restricted | Compare normal stopper opening |
| Slow drainage began after a new stopper or drain | Opening travel or sink and drain compatibility needs checking | Compare the installation fit |
| Hair is visible around the stopper | Accessible debris may contribute | Clean only removable parts you can access safely |
| The sink remains slow with the stopper correctly open | A restriction may be below the visible opening | Stop assuming the stopper is the entire problem |
| Water appears in the cabinet | A leak accompanies the drainage problem | Stop using the sink and arrange diagnosis |
| Several fixtures back up or gurgle | A shared drain or sewer problem is possible | Stop adding water and contact a plumber or sewer utility |
These are sorting clues, not diagnoses. For example, two slow sinks do not prove the public sewer is blocked, and one slow sink does not prove the obstruction sits directly below it.
What can make a bathroom sink drain slowly?
Hair, soap residue, and other debris can accumulate on drain components. The Home Depot identifies this buildup as a common cause in its bathroom sink drain guide. Cleaning the accessible collection point is a reasonable first check when there are no warning signs.
A mechanical problem can look similar. A lift-rod stopper may not travel far enough, or a push-operated stopper may stay partly closed. If the problem began immediately after replacing a stopper or drain, tell the installer. Do not assume the new part fits simply because its finish matches the faucet.
Kohler’s stopper identification guide distinguishes parts by dimensions, body design, and attachment details. Use the model information when seeking replacements. Buying a vaguely similar universal part before identifying the fault can leave both the drainage problem and a new sealing problem.
Check for conditions that make DIY work unsuitable
Before reaching into the basin, ask whether anyone has used drain opener. If the answer is yes or uncertain, do not insert a tool, plunge, or disconnect pipes. Tell the plumber the product name and approximate time it was added, and keep its packaging available.
Drano’s Snake Plus safety directions warn against plunging during or after use and against mixing the product with other cleaners. A drain that still holds liquid may also hold chemical residue. Adding another cleaner, bleach, or vinegar is not a safe way to neutralize an unknown product.
Stop as well if there is a cabinet leak, a loose drain assembly, badly corroded pipework, or water near electrical equipment. In a rental, report the issue to the property manager before dismantling fittings. A small blockage does not justify creating a larger leak in unfamiliar plumbing.
Which kind of sink stopper do you have?
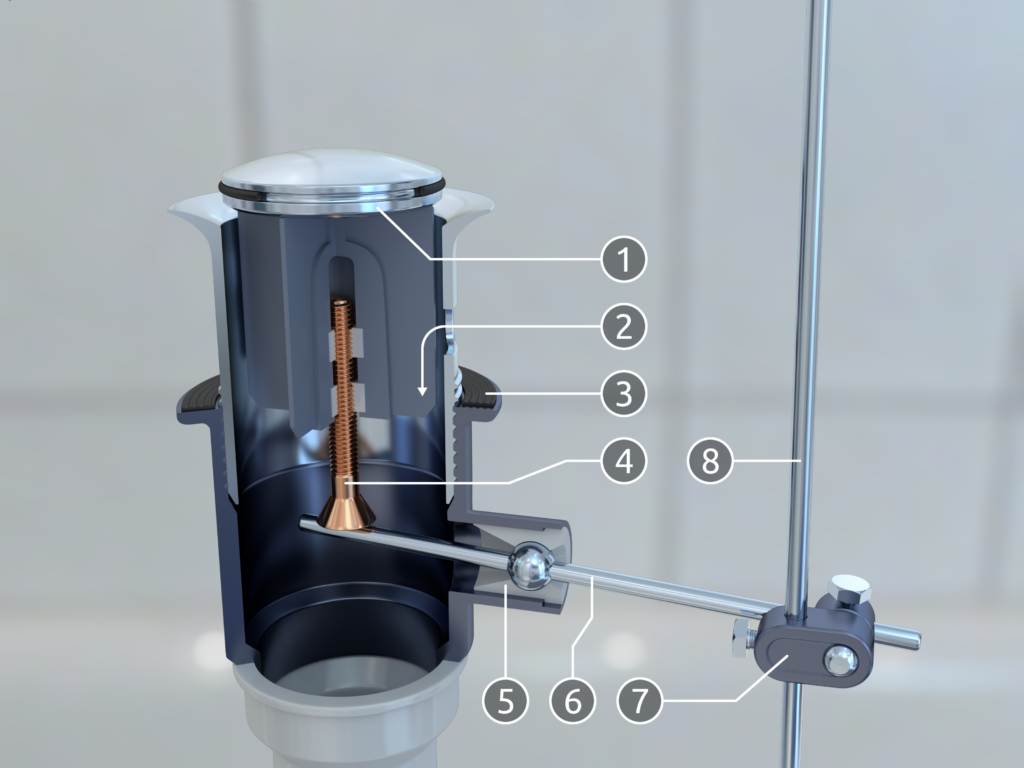
Use the model’s removal method, not cap appearance. Inspect only dry, accessible areas without disturbing connections. Do not pull against a retaining rod. Stop if parts are corroded, inaccessible, or do not move as directed.
| Visible clue | What to check | Avoid this assumption |
|---|---|---|
| A lift rod behind the faucet | Look without disturbing connections for the linkage below the sink. Find the drain model’s instructions. | Do not assume the stopper lifts free; a ball rod may retain it. |
| The cap opens and closes when pressed | Find the manufacturer’s removal and cleaning method for that push-operated drain. | Do not assume that pulling, unscrewing, or prying is correct for every cap. |
| No recognizable control or the part will not move normally | Photograph the visible cap and any accessible model marking for the manufacturer or plumber. | Resistance is not proof that more force will release it. |
How to clean an accessible sink stopper: five safe steps
Before these steps: identify the drain model and check the safety conditions above. Do not proceed if drain chemicals may be present, wastewater is backing up, a connection leaks, or water is near electrical equipment. The video below is not a universal stopper-removal method.
- Prepare the area. Turn off the faucet, let ordinary standing water drain away, and remove items that could fall into the basin. Use gloves, eye protection, a flashlight, and a cloth. Skip this procedure if chemical residue or contaminated backup may be present.
- Identify how the stopper works. Look for a lift rod behind the faucet or a push-operated cap. Find the instructions for the exact drain. Do not assume all stoppers lift straight out.
- Check its open position. Operate the normal control gently. If it sticks, tilts, or barely moves, stop forcing it. Photograph the mechanism for the manufacturer or plumber.
- Clean only safely removable parts. If the manufacturer describes removal from above without disturbing a sealed connection, follow that procedure. Wipe accessible hair and residue into the trash with a cloth or suitable soft brush; use a cleaner approved for the finish.
- Reinstall and observe. Return the stopper to its correct position. Use a small amount of water, stop if it accumulates, and check the visible cabinet area for fresh moisture.
A stopper held by a pivot rod needs a different procedure. Kohler’s pop-up drain instructions explain that some stoppers are retained by a ball rod entering the side of the drain. Removal involves that connection. If yours matches this design and you are not comfortable restoring the seal correctly, have a plumber clean or adjust it.
Do not twist the entire drain body, use pliers on a decorative cap, or pull harder when a part resists. Resistance can mean it is attached, not merely dirty. Keep removed parts together and stop if a seal is split or a component breaks.
Watch the correct stopper design before trying removal
This example is a push-operated drain, not the rod-operated mechanism in the cutaway above. Delta’s manufacturer video covers installing, removing, and cleaning a push-pop sink drain. Match your drain model before copying a movement; a similar-looking cap may release differently.
Source: Delta Faucet’s push-pop drain video guide. Open the video on YouTube if the player is unavailable. This is third-party demonstration footage, not a repair performed by The Home Fix Guide.
For a lift-rod stopper: use Delta’s separate rod-operated pop-up guide or your drain manufacturer’s equivalent. Do not pull against a retaining rod or loosen a sealed connection merely to match the video.
Limit this check to safe, identified access. Keep the faucet off during handling. Do not proceed if drain cleaner, wastewater backup, leaking joints, or a stuck component is present. Installation and whole-drain removal shown in the source are not required just to inspect accessible debris. After permitted cleaning, reinstall the stopper and use only a small amount of water; stop for accumulation or fresh cabinet moisture. If the symptom persists, use the next section rather than repeatedly dismantling the drain.
What if cleaning the stopper does not help?
| Result after the accessible stopper check | Next action |
|---|---|
| Drainage returns to normal | Record what was removed or adjusted and monitor during normal use. |
| The sink is still slow but other fixtures are normal | A deeper local restriction or trap issue is possible. Do not automatically move to chemical cleaner or dismantling. |
| The sink gurgles or another fixture affects it | Compare gurgling while draining with noise after another fixture runs; the problem may extend beyond the stopper. |
| Several drains are slow or wastewater backs up | Stop adding water and arrange assessment. Use the multiple-drain guide to choose who to contact. |
If the basin still drains slowly with the stopper working correctly, the visible check has reached its limit. A deeper obstruction, trap problem, or installation issue needs a different assessment. A clean-looking opening does not establish that the pipe is clear.
A plumber can decide whether trap access, a suitable drain tool, or further inspection is appropriate. Avoid pushing an improvised wire into an unfamiliar drain or using a powered auger without the necessary training. Do not repeatedly add water to see whether a complete blockage has changed.
This guide does not recommend boiling water as a universal fix. The Home Depot warns that boiling water can damage plastic pipes and porcelain sinks. Material compatibility matters even when a method looks simple in a video.
If moisture also appears below the basin, stop using it. Our under-sink leak guide explains how timing and the first wet location help describe a leak; its kitchen-specific hose and disposal checks do not apply to every bathroom installation.
If an odor accompanies the slow drainage, our sink odor guide explains how to distinguish mild drain-area smells from odors in the water and recognize warning signs that need urgent help.
When should you call a plumber promptly?
If the sink also makes bubbling sounds, our gurgling sink guide explains what to record when the sound follows a toilet flush or another fixture draining.
Seek help for repeated blockages, a completely stopped drain, damaged fittings, cabinet moisture, or a stopper that cannot be serviced safely. A problem that returns soon after clearing deserves a diagnosis rather than another identical treatment.
Multiple affected fixtures, gurgling, strong sewage odors, and sewage at floor drains are warning signs listed by Winterset’s sewer department. If wastewater is backing up, stop using connected plumbing and contact your local sewer utility or an appropriate plumber. Keep people and pets away from contaminated water. Local reporting arrangements differ; use your own utility’s instructions.
For the service call, record which fixture changed first, whether the change was sudden, any recent installation work, whether other drains are affected, and all products already used. A short video of normal use can help if it can be taken safely without producing another backup.
If the problem extends beyond the basin, compare multiple slow drains and shared-line symptoms. If a tub or shower is receiving water from its drain, stop using water and follow the backup response guide.
How to compare repair costs
Cleaning an accessible stopper, replacing a drain assembly, and clearing a shared waste line are different jobs. This guide does not give a national dollar estimate because the fault and access have not been established.
Ask for an itemized quote in USD showing the visit or diagnostic charge, the proposed clearing method, replacement parts, and any after-hours fee. Ask what happens if the first method fails and whether further inspection needs separate authorization. Compare quotes for the same scope rather than comparing a basic advertised clearing price with a complete repair.
Keep a useful record after the repair
Note what was found and what was actually changed. “Hair removed from stopper” is more useful than “drain fixed” if the symptom returns. Keep the part number and invoice when a component is replaced.
Dispose of collected hair in the trash, clean accessible stopper surfaces using the manufacturer’s instructions, and note changes during ordinary use. Add the observation to your home plumbing maintenance checklist. If the cabinet is hard to monitor, consider a water leak sensor in a suitable location; a sensor can alert you to water reaching it but cannot diagnose or clear a drain.
Frequently asked questions
Why is the sink slow only when the stopper is installed?
The stopper’s opening, fit, or collected debris may be contributing. That comparison is useful, but it does not prove the rest of the drain is unrestricted. Compare the stopper’s normal opening and drain compatibility before adjusting it.
Can a slow drain cause low faucet pressure?
Drainage and incoming water flow are separate observations. A slow drain makes water collect in the basin; weak supply flow changes what comes out of the spout. Both problems can occur at the same fixture.
Should I remove the P-trap next?
Not automatically. First consider chemicals, pipe condition, connection type, access, and your ability to reassemble and check for leaks. If any of these is uncertain, let a plumber choose the next step.
Featured photograph: Point3D Commercial Imaging on Unsplash. It illustrates a bathroom setting, not a documented blockage or repair performed by our team. This is a research-based guide; model-specific instructions take priority. Stopper-opening and overflow-compatibility references reviewed October 3, 2026.