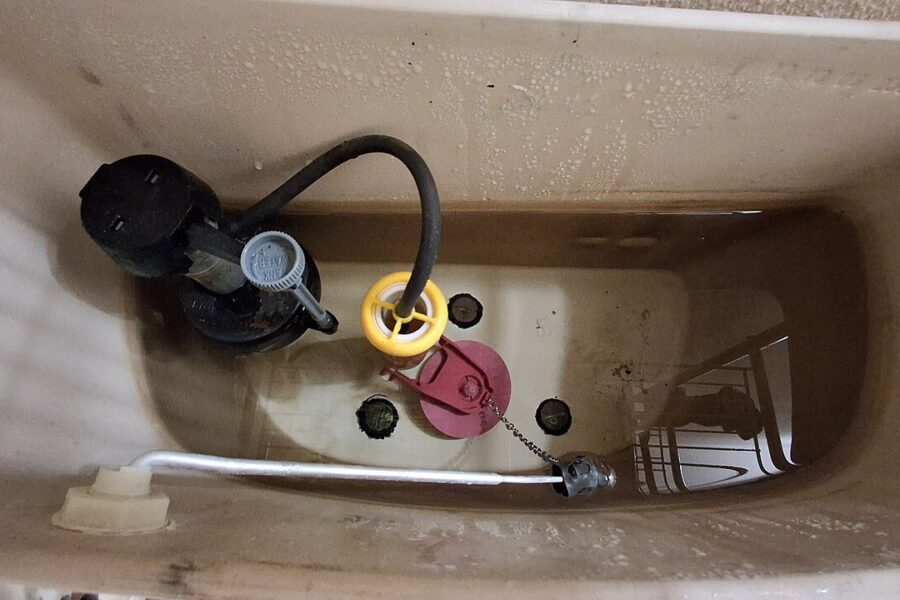
A fill valve brings fresh water into the toilet tank; a flush valve releases tank water into the bowl. The flapper is the hinged seal that closes a conventional flush valve between flushes. If a flapper leaks, a working fill valve may repeatedly refill the tank. Hearing it run does not prove the fill valve has failed.
This comparison applies to conventional gravity-flush toilets. Some toilets use a canister seal instead of a hinged flapper. Pressure-assisted systems, concealed cisterns, and electronic flush mechanisms need their own instructions. Use the toilet and valve model numbers before choosing any replacement.
Start from the symptom as well as the part name: our toilet troubleshooting overview separates running, slow filling, weak flushing, and visible leakage.
Fill valve vs flush valve: where does the flapper fit?
| Part | Main role | What not to confuse it with |
|---|---|---|
| Flapper or canister seal | Closes the tank’s flush outlet between flushes. | It is not the valve bringing supply water into the tank. |
| Fill valve | Refills the tank and controls the stopping level. | It is not the complete flush outlet assembly. |
| Flush valve | The outlet assembly through which the tank discharges during a flush. | Replacing its seal is not always the same job as replacing the whole assembly. |
That distinction matters when reading a quote or product listing. “Valve replacement” is incomplete information. Ask which valve, which part number, and whether a seal-only repair or an entire assembly is proposed.
View the original tank refill animation
Open this panel to watch the original moving image. For a side-by-side comparison, use the two labeled part previews below.
Compare the two parts in a real tank
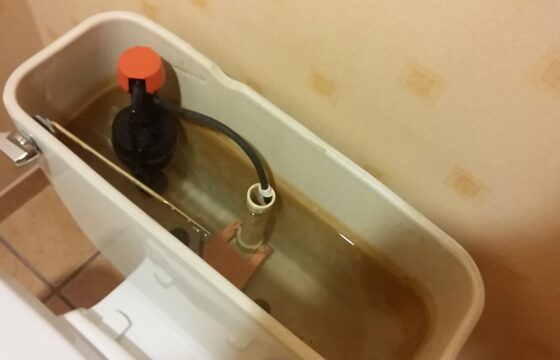
Flapper: the red hinged seal
Select the preview to play the full original animation, or open it in a new tab. The smaller preview is not the full motion sequence.
Fill valve: the black upright assembly
Select the preview to play the full original animation, or open it in a new tab. The smaller preview is not the full motion sequence.
Real tank image sequences: Ranch9613, flapper movement and fill-valve shutoff, CC0. These show the parts installed in the same toilet; replacement parts may have different shapes and colors.
Watch the fill valve and flush valve work in sequence
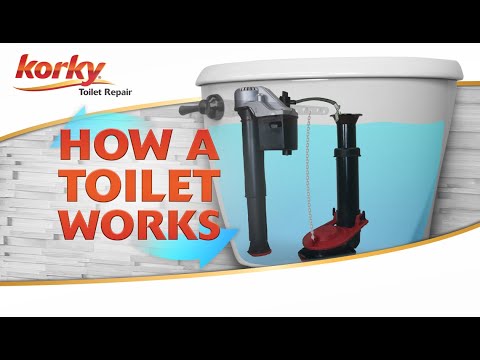 Fill valve and flush valve: different jobs
Manufacturer video: Korky Toilet Repair — Anatomy of a Toilet. Open on YouTube if the player is unavailable. This is third-party explanatory footage, not a repair performed by The Home Fix Guide. Product mentions do not establish compatibility with your toilet.
Follow the water, not just the part name: the flapper lifts to let tank water leave through the flush valve; the fill valve admits replacement water as the tank empties. The seal closing and the supply shutting off are different events. Use the photographs above to locate those components in this example.
Why the noisy part may not be the faulty part
A working fill valve can be audible because it is replacing water lost through the flush outlet. Korky’s running-toilet guidance explains this sequence. Use the table below to choose a check, then follow the running-toilet observation sequence before deciding which component needs service.
What the symptoms can—and cannot—tell you
| What you see or hear | Check first | What the observation does not prove |
|---|---|---|
| Brief refills after the toilet has been quiet | Check for tank-to-bowl leakage with the dye-test guide. A positive result identifies water movement, not the failed part. | The fill valve may simply be replacing water lost elsewhere. |
| Tank water rises over the overflow rim | Use the running-toilet checks to review the fill-valve stopping level and free float movement, following the model instructions. | A new flapper alone will not correct the high stopping level. |
| Jiggling the handle changes the running | Handle return, chain snagging and whether the flapper can close. | The symptom alone does not identify a worn-out seal. |
| Refilling eventually stops but takes unusually long | Use the slow-filling toilet checks. | A slow refill does not by itself prove the fill valve needs replacement. |
| Water appears on the floor or supply connection | Stop this parts comparison and use the external toilet leak checks to investigate the visible source. | An internal flapper repair is not an explanation for every external leak. |
Kohler’s intermittent-running guidance distinguishes lever trouble, overflow, the outlet seal, and the gasket where the flush-valve assembly meets the tank. The tank water level and installed mechanism matter alongside the sound.
If water is outside the toilet, pause this comparison. A wet floor, cracked porcelain, or a leaking supply connection needs a different investigation. Stop using the fixture when appropriate and seek professional help; do not buy a flapper solely because you also hear refilling.
Canister flush valve vs flapper: which seal does your toilet use?
A hinged flapper swings open; a canister or tower lifts from a separate seal around the flush outlet. Both designs release tank water during a flush and seal the outlet afterward. Neither is the fill valve that brings fresh water into the tank.
Hinged flapper
A flexible flap closes over the outlet and pivots upward when lifted. The red part in the photographs above is this design.
Before ordering: confirm the flush-valve opening, attachment, and toilet-specific settings. A similar shape or color does not establish a match.
Canister or tower with a seal
An upright assembly lifts to open the outlet. Its rubber seal is a separate service part; it is not a hinged flapper.
Before ordering: match the installed flush-valve model and documented seal part number. A package labeled “universal flapper” does not establish canister compatibility.
Korky’s toilet anatomy guide explains both designs. Its flush-valve seal finder shows why different towers need different seals. Kohler’s running-toilet guide also distinguishes the outlet seal from the gasket where the valve meets the tank.
Identify the installed mechanism before shopping, then follow its diagnosis and service instructions.
Check compatibility before ordering
The most useful shopping information is a model number, not the color of the old rubber part. Record the toilet brand and model, photograph the existing mechanism, and find the manufacturer’s service-parts information. If a replacement valve has previously been installed, record its model too.
Worked lookup: American Standard Cadet tank 4021
This is a document-based example, not a toilet we inspected. In American Standard’s 2023 parts catalog, printed pages 5–6 (PDF page 3), locate tank model 4021, then read across the separate component columns. The catalog lists:
| Component | Catalog part number | What the listing identifies |
|---|---|---|
| Flapper/seal | 7381193-200.0070A | The separately listed flapper assembly |
| Flush valve | 7381294-400.0070A | The flush-outlet assembly, rather than only its flapper |
| Inlet/fill valve | 7381548-400.0070A | The separate supply valve |
Use the distinction, not this table as a shopping instruction. A quote for a flapper and one for the flush-valve assembly cover different parts. The catalog does not diagnose which one failed. Confirm the complete tank identifier, any previously replaced valve, and current manufacturer compatibility before ordering; a family name or “universal” label is insufficient.
Catalog row and official part listings checked October 4, 2026. This lookup does not document a repair or professional review.
The EPA recommends using the owner’s manual or manufacturer information to identify replacement parts, and suggests bringing a photograph or the old flapper for comparison. That is a stronger starting point than choosing whichever package looks close.
Common flapper listings mention 2-inch and 3-inch sizes, but nominal size is only one compatibility detail. Mounting style and the intended flush behavior also matter. A canister toilet may require a specific ring seal rather than a hinged flapper. Follow the manufacturer’s dimensions and matching instructions instead of assuming the outside width of a rubber piece identifies the valve.
Read the listing before choosing a toilet repair part
A product title can group several repair types together. Use the exact tank and installed-valve identifiers from the lookup above to narrow the choice.
| Listing wording | Check before ordering |
|---|---|
| Flapper or flush-valve seal | Match the installed mechanism and the manufacturer’s stated compatibility. A hinged flapper and a canister ring are different parts. |
| Fill valve | Confirm the valve fits the tank and matches the toilet’s refill requirements; a running sound alone is not a diagnosis. |
| Complete flush valve | Check the work required to replace the outlet assembly. The job can differ from changing its seal. |
| Universal or complete repair kit | Read the compatible-model list, exclusions, and included components. The label does not establish that every toilet is covered. |
Korky’s seal finder separates tower/canister seals from traditional flappers and lists model-specific options. If a shop listing and the manufacturer’s information disagree, resolve the mismatch before ordering. For an unexplained refill cycle, begin with the toilet dye test and the symptom checks above.
Three part examples for different repair jobs
Affiliate disclosure: We may earn a commission when you buy through the Amazon links on this page. As an Amazon Associate I earn from qualifying purchases.
Start with the fault and the installed valve, then match the part. The examples below illustrate three different repair types. Confirm compatibility with your own toilet; the Cadet 4021 example above has its own parts list.
On a narrow screen, scroll the table sideways to compare all columns.
| Model and source | Repair type | Fit check before ordering |
|---|---|---|
| Korky 100 / 100BP 1-pack. Confirm the 2-inch flapper fit and flush setting. | Adjustable 2-inch hinged flapper with a chain. | Match a compatible 2-inch flush valve and the toilet’s flush-volume setting. A 3-inch flapper or a canister seal requires a different part. |
| Korky 435 / 435BP Replacement seal kit; not a complete flush valve. | A kit containing two replacement seals: one for the listed Kohler applications and one for American Standard Champion 3. | Match the applicable original seal number: Kohler GP1059291 or American Standard 738651-0070A. Select the seal for that valve; the kit does not replace the complete flush-valve assembly. For Champion 4, use Korky’s separate seal lookup before ordering. |
| Korky QuietFILL Platinum 528MP | A fill valve with a bowl-refill adjuster. Korky lists a height adjustment of 8½–14 inches. | Confirm tank clearance and the required water-level and refill settings. Choose a fill valve when the diagnosis points to filling or shutoff; it does not replace a leaking flapper or canister seal. |
528MP height check: Korky’s linked specification lists an adjustment range of 8½–14 inches, while the Amazon US description retrieved on October 14, 2026 lists 7¾–13½ inches for 528MP. We have not established the reason for this difference. If fit depends on either limit, ask Korky or the seller to confirm the adjustment range in the instructions for the valve being supplied before ordering. Do not assume the two ranges are interchangeable.
Model details checked against the linked manufacturer pages on October 11, 2026. We have not tested these parts in your toilet. Check the exact model and package contents in the seller’s listing before ordering.
Write a short purchase checklist before opening a shopping page:
- Toilet brand and model, plus any existing replacement valve model.
- Exact part number or documented compatible alternative.
- Whether the package contains a seal, a fill valve, or a complete flush-valve assembly.
- Any clips, adjustment instructions, or other required pieces included with that part.
- The seller’s return conditions if the compatibility information is uncertain.
Does a complete repair kit make more sense?
A kit can be convenient when its components match the toilet and more than one worn part needs service. It can also include components you do not need. Compare the actual fault and compatibility information, not the number of pieces in the box.
Before buying, ask yourself: what observation supports replacing each component? If the only answer is “the kit contains it,” you have not established that the extra work is necessary. If parts are old or previously mismatched, ask a plumber or the manufacturer whether a broader repair is appropriate.
Replacing an entire flush-valve assembly may involve different access and work from replacing an accessible seal. Do not assume a video showing a simple rubber-part swap covers a tank-removal job. If the repair scope changes after you open the instructions, reassess whether it is still a suitable DIY task.
Safe limits for inspection and repair
You can begin by reading model markings, taking photographs, and watching a normal flush from a safe position. Set the heavy tank lid on a stable padded surface. Keep tools away from porcelain edges and do not force an old shutoff valve.
Before removing parts, follow the specific instructions for shutting off and draining the fixture. Do not remove a pressurized valve cap or disconnect a live supply. Stop if the shutoff leaks, the supply connection is corroded, or you cannot positively identify the system.
After any correctly completed repair, observe several full cycles and check outside connections for moisture. Do not keep tightening a fitting indefinitely to stop a leak. A leak that persists after correct assembly needs diagnosis, not simply more force.
Compare costs by scope, not by part name alone
For a parts-only purchase, compare the current delivered price of the exact compatible part, including tax where applicable. For professional work, ask for a quote in USD describing diagnosis, parts, labor, and any additional work such as servicing a failed shutoff.
This article does not give a national installed-price range: the location and repair scope are not specified. A seal-only job and a job requiring tank removal are not equivalent quotes. Ask whether the visit fee is included in the repair price and what happens if a second fault is found.
If the water bill still seems high
A toilet repair does not prove there are no other water losses. Compare actual consumption and billing dates, and consider a water meter leak test when you can stop ordinary use safely. An intermittent problem may require more than one observation period.
Keep the repair date, part number, and before-and-after symptoms with your plumbing maintenance record. Those notes make a later call more useful and help you avoid ordering the same unsuitable part again.
Frequently asked questions
Can I keep the old flapper when replacing the fill valve?
A new fill valve does not automatically require a new flapper. You can keep the existing flapper if it matches the installed flush valve, moves freely, and seals properly. Replace both parts only when their condition and the diagnosis justify it; a combined kit is not evidence that both have failed.
Korky’s troubleshooting guidance checks flapper/seal leakage separately from fill-valve problems. For a possible tank-to-bowl leak, use the toilet dye test; a positive result identifies a leak path, not automatically the failed part.
Does every toilet have a flapper?
No. Canister, pressure-assisted, and other designs differ. Identify the mechanism before following a flapper-replacement procedure.
Feature photo: Ranch9613 / Wikimedia Commons, CC0 1.0. Open tank shown for component identification; it does not document a repair by our team. Resized for display. Read our Editorial Policy and Disclaimer.